Growing green gram (moong dal) is very popular in India and some other South Asian countries. And it is one of the main pulse crop of India. It is very nutritious and a great source of protein along with fiber and iron. It is also a great source of calcium, phosphorous and many vitamins.
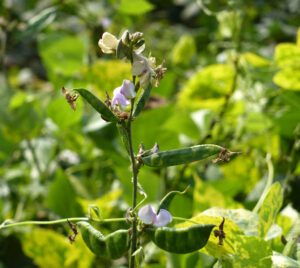
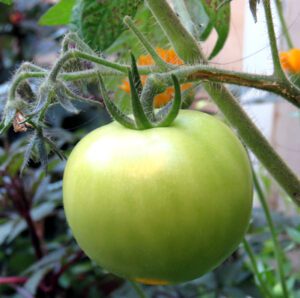
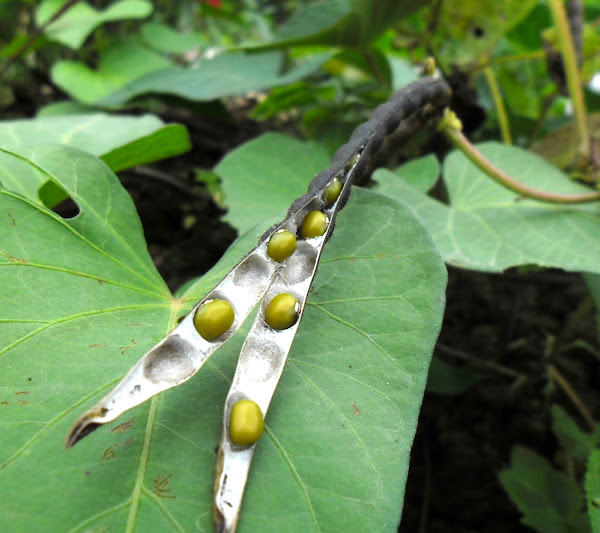
And the moong dal/green gram can become a very important source of protein for people in some regions where animal protein is scarce. The green gram (Vigna radiata) is actually a plant species in the legume family. It is an annual vine with yellow flowers and fuzzy brown pods.
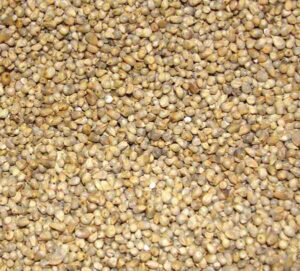
The pods are about 5 inches long, containing 10-15 seeds and varying in color from yellowish-brown to black. And the seeds also vary in coloration from yellow, brown, mottled black or even green.
The green gram is most commonly used as an ingredient in both savory and sweet dishes. Bangladesh, India, China, Korea, Nepal, Sri Lanka, Pakistan, South Asia and Southeast Asia are the top countries and regions where green gram is mainly cultivated.
Origins And Other Names of Green Gram
According to Wikipedia, the green gram is thought to have originated from the Indian subcontinent where it was domesticated as early as 1500 BC.
Carbonized green gram have been discovered in many archeological sites in India. Areas with early finds include the eastern zone of the Harappan civilization in Punjab and Haryana, where finds date back to about 4,500 years, and South India in the modern state of Karnataka where finds date back more than 4,000 years.
The cultivated green grams were introduced to southern and eastern Asia, Africa, Austronesia, the Americas and the West Indies.
The green gram is also known by many other different names in different parts of the world. It is also called mung bean, maash, moong, golden gram, look dou, lutou, moyashimamae, oorud, chop suey bean etc. In India, the green gram is also known by many different names in different local languages. It is called Moong in Hindi, Mogu or Mogu dail in Assamese, Mug or Mug dal in Bengali, Mag in Gujarati, Pacchesaru or Hesaru Bele in Kannada, Cherupayar in Malayalam, Mug in Marathi, Muga or Muga dali in Oriya, Moongi in Punjabi, Mung Eta in Sinhala, Pachai Payaru in Tamil, Pesara pappu in Telugu, Padengi in Tulu and Moog in Konkani.
Uses And Nutrition
The green gram is commonly used in cuisines across Asia. It is used in many different ways (from whole beans to paste). It is used in many delicious dishes not only in India, but also in some other Asian countries. The green gram is very nutritious. It is an excellent source of protein, carbohydrate, vitamins, minerals and dietary fiber.
Health Benefits of Green Gram
The green gram is nutritious and it is very good for human health. It has many health benefits and considered as an ideal diet where source of animal protein is limited. Some notable health benefits of green gram are listed below.
- The green gram is an excellent source of protein, carbohydrate and minerals.
- Regular consumption of green gram can help you to loose weight.
- It is a very good source of dietary fiber and iron.
- The green gram helps to control blood pressure.
How to Start Growing Green Gram?
Growing green gram is very easy. And you can start growing green gram, even if you are a beginner. Here we are describing more information about growing green gram from planting, caring to harvesting.
Step 1: Select A Location
First of all, you have to select a good location for growing green gram. The green grams can be grown almost everywhere, but they grow very well in well-drained soil with the availability of full sun.
Step 2: Prepare The Soil
The green gram plants can be grown on a wide range of soil types. But well-drained, loamy to sandy-loam soils is considered good for growing green gram. Saline and water logged soils are not good for green gram cultivation.
2-3 ploughing is required for preparing the soil and bringing the soil to fine tilth. Carry out planking after each ploughing. Try to remove the weeds from the field while preparing the soil.
Apply all the fertilizers while ploughing or tilling the soil. For commercial production, apply about 10-12 kg urea and 80-100 kg super phosphate per acre while preparing the soil.
Step 3: Climate Requirements for Growing Green Gram
Warm and humid climate with temperature range of 25 °C and 35 °C, with moderate rains of 850 to 1000 mm is considered best condition for growing green gram.
Step 4: Best Time For Growing Green Gram
The green gram is a summer season crop. It can be cultivated as Kharif as well as summer crop. The first fortnight of July is the optimum time for Kharif sowing. And from March to April is optimum time for summer sowing.
Step 5: Select A Variety
There are many green gram varieties available. Some of the popular varieties in India are PS 16, Mohini, Pusa Baisakhi, Jawahar 45, ML 1, TMB 37, SML 668, PAU 911, ML 818, ML 2056, RUM-1, HUM-12, BM-4, PDM-54, JM-72, PDM-11 and K-851.
You can choose any variety depending on it’s availability in your area. You can also consult with some of your local farmers or agriculture specialist for having good recommendation.
Step 6: Purchase Seeds
After selecting a variety, you have to purchase seeds from any of your nearest market. The green gram is very common in India, and the seeds should be easily available in your area. You can also consider ordering the seeds online.
Step 7: Seeds Per Acre
You will need about 12-15 kg seeds per acre for summer season crop. And for Kharif season crop, you will need about 8-9 kg seeds per acre.
Step 8: Planting
You can either scatter the seeds throughout the field, or plant in rows. For planting in rows, mark several rows in the soil after leveling it. Space the rows to about 10-12 inches apart. The sow seeds to about 4 inches apart for Kharif crop, and about 3 inches apart for summer season crop. Sow the seeds to about 1 inch deep. Drill/pora/kera methods can be used for sowing the seeds.
Treat the seeds with fungicide or insecticide before sowing them into the field. You can treat the seeds with Captan or Thiram at the rate of 3 grams per kg seeds. Light watering after sowing the seeds will help to germinate the seeds faster.
Step 8: Caring
The green gram plants generally require less care and management. But, taking additional care will be very good for growing green gram plants. Here we are describing more information about the caring steps for growing green gram.
Fertilizing: In most cases, you don’t have to apply additional fertilizers for growing green gram.
Watering: The green gram is mainly grown as a Kharif crop. Depending upon the climatic conditions, water the plants if needed. 3-4 irrigation is required for summer season crop, depending upon soil type and climatic conditions. Excessive watering can damage the yield. So stop watering 55 days after sowing the seeds.
Controlling Weeds: Weeds consume nutrients from the soil. So you should always try to keep your crop field free from weeds. You should remove the weeds from the soil during ploughing for the first time. And control additional weeds by hoeing if you notice any. First hoeing should be done 4 weeks after sowing the seeds, and second hoeing 2 weeks later after first hoeing.
Step 9: Learn About Pests And Diseases
Stem fly is the main pest found in this crop. Stem flies affect the plant at the early stages, leading to drying and withering. Yellow mosaic disease can be observed during the growth stages of this crop. However, you should always keep good contact with any expert or agriculture specialist. And ask him/her for help if you notice any pests or diseases in your crop field, and take necessary steps as soon as you can.
Step 10: Harvesting
You should start harvesting when about 85 percent of the pods are fully matured. Try to to avoid bad conditions for harvesting. And you should not wait for getting all the pods riped. Avoid over-ripening of the pods, because you will loose many of the seeds if the pods are too much riped.
You can either cut the entire plant or the stalks which are bearing the seeds. And bring them home after cutting, and keep in open space for sun drying. And after drying, you should thresh either biting by stick or by using a machine. Clean and sun dry the seeds after threshing.
Step 11: Yield
Exact yield can vary and actually depends on the seed and farm management practices. But on an average, you can expect between 1000 to 1400 kg per hectare.
Step 12: Marketing
Marketing green gram is very easy and simple. You can easily sell your products in the local market. Although, we recommend determining your marketing strategies before starting this business.
Hope this guide has helped you to learn more about growing green gram. Good luck and may God bless you!